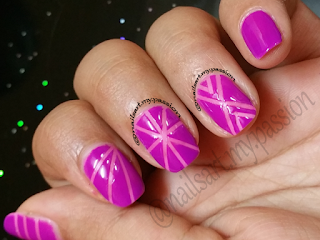
Pink Tribal look Nails
Requirements:
1. Light Pink Colour Base Nail polish
2. Dark Pink or Purple Nail Polish (for Top Layer)
3. Nail Art Striping Tape*
4. Dotting tool* (small)
5. Top Coat -------------> Sealing the Design
6. Nail polish remover/Acetone
7. Cotton buds
 |
| Pink Tribal Look Nails |
Procedure:
Step 1:
Apply Light pink coloured Nail Polish as the Base of the Design (Picture 1). Allow it to dry completely to avoid peeling of the polish with the Nail art tape.
 |
| Picture 1 |
Step 2: Applying tapes on the Nails for Design
Cut the Nail art Tape into small pieces, size of the tape should be a little longer than the area of the Nail it will cover.
Each Nail will be wearing a different design so arrange and stick the tapes on the Nails as shown below:
For Index Finger:
Apply the Nail tape as shown in Picture 2
 |
| Picture 2 |
For Middle finger:
Follow the taping technique as shown in Picture 3
 |
| Picture 3 |
For Ring finger:
Stick the tapes on the base coat as in Picture 4
 |
| Picture 4 |
For Little finger:
Do not apply any nail art tape as this finger will have a simple dots. Just apply a coat of the Dark Pink or Purple Shade of Nail Polish (depending on which among the two colours you have selected). Refer Picture 5
 |
| Picture 5 |
Step 3: Creating the Design
Select a Nail with taped Design and apply the darker shade Nail Polish on top of the Nail covering the Tape Design you have created in Step 2. The result should look similar to Picture 6.
 |
| Picture 6 |
(Note: Please do not peel of the entire tape design or it may spoil the final design due to wet Polish layer)
What we would get would look like Picture 7.
 |
| Picture 7 |
Repeat the same procedure for all the nails having the Tape design. (Refer Picture 8)
 |
| Picture 8 |
For the Little finger just create three tiny dots one on top of the other. (Picture 9)
 |
| Picture 9 |
Step 4: Creating dots
Now to complete the design, create dots using small Dotting tool along the lines at the centre.
Step 5: Sealing the design
Using a good quality transparent top coat seal the design on the nails.
That is all.... Your Nails have the Tribal Look Now...!!!!!!!!
Tip: This is another technique for creating Nail art designs using Nail art Tapes along with the Traditional technique that I have discussed on the Basic Techniques Page. You can create many different designs using this technique merely by sticking tapes on your nails and applying another Nail polish shade on them.

No comments:
Post a Comment